« เมื่อ: กุมภาพันธ์ 15, 2016, 02:19:55 PM »
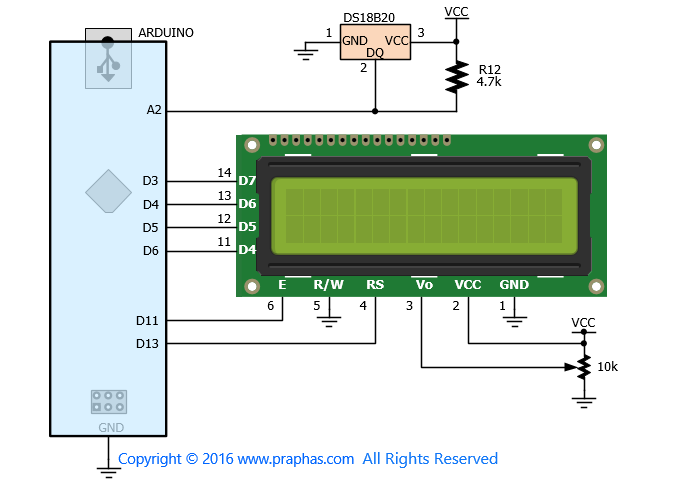
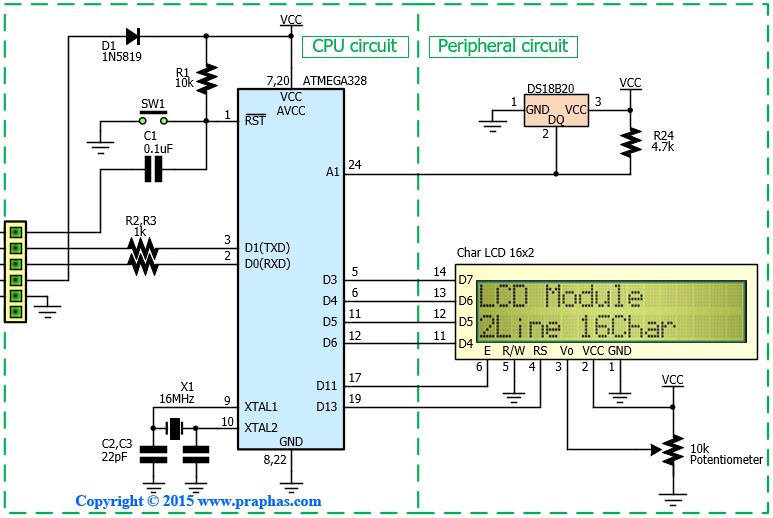
เขียนโปรแกรมอ่านค่าอุณหภูมิจาก DS18B20 แสดงผลที่ LCD16x2
ไลบารี่เพิ่มเติม
-OneWire.h https://github.com/PaulStoffregen/OneWire
-DallasTemperature.h https://github.com/milesburton/Arduino-Temperature-Control-Library
*ดูวิธีติดตั้งในงานครั้งที่ 20
*ไลบารี่ LiquidCrystal.h มีมาให้แล้วพร้อมโปรแกรม Arduino IDE ไม่ต้องติดตั้งเพิ่ม
โจทย์การทดลอง
-เขียนโปรแกรมรับค่าอุณหภูมิที่อ่านจาก DS18B20 แสดงผลที่ LCD16x2
-โปรแกรมรายละเอียดพิเศษรายกลุ่ม (แจ้งให้ทราบเมื่อถึงชั่วโมงเรียน)
วงจรที่ใช้ในการทดลองสำหรับผู้ที่ใช้บอร์ด Arduino วงจรที่ใช้ในการทดลองสำหรับผู้ที่ใช้ไอซี ATmega328 (ที่มี Boot Loader Arduino)
 ตัวอย่างโปรแกรมอ่านค่าจาก DS18B20
 #include <OneWire.h>
#include <DallasTemperature.h>
OneWire oneWire(2); //Connect to Pin 2 (D2)
DallasTemperature sensors(&oneWire);
void setup(void)
{
Serial.begin(9600);
Serial.println("Dallas Temperature IC DS18B20");
sensors.begin();
}
void loop(void)
{
Serial.print(" Requesting temperatures...");
sensors.requestTemperatures(); // Send the command to get temperatures
Serial.println("DONE");
Serial.print("Temperature is: ");
Serial.print(sensors.getTempCByIndex(0));
Serial.println(" Degrees C");
Serial.print("Temperature is: ");
Serial.print(sensors.getTempFByIndex(0));
Serial.println(" Degrees F");
}
#include <LiquidCrystal.h>
/* The circuit:
 * LCD RS pin to digital pin 7
 * LCD E  pin to digital pin 6
 * LCD D4 pin to digital pin 5
 * LCD D5 pin to digital pin 4
 * LCD D6 pin to digital pin 3
 * LCD D7 pin to digital pin 2
 * LCD R/W pin to ground
*/
LiquidCrystal lcd(7,6,5,4,3,2);       // set up the LCD's connection pins
void setup()
{
  lcd.begin(16, 2);       // set up the LCD's number of columns and rows:
  lcd.print("hello, world!");
}
void loop() {}
« แก้ไขครั้งสุดท้าย: มิถุนายน 28, 2017, 09:14:59 AM โดย admin »

บันทึกการเข้า